ddev: Easy Docker handling for web developers
What is ddev?
ddev is just a helper for the usage of docker. It streamlines the way you interact and configure docker for web development to only a few commands and a config file.
tl:dr / Who is it for?
If you're already confident with your web development process or your
already happily using docker in one or the other way - this might not be much of a benefit for you.
But, if you do not use docker at all or don't know where to start or just want to spice (speed) things up a notch, then read on.
ddev lets you focus more on your code and less on dev-ops.
ddev vs Docker
Ddev utilizes Docker and merely offers a simplified way to manage and use web development environments. Thus, using ddev essentially means using Docker.
However, for those who have no prior experience in natively creating or running Docker containers, ddev offers an easy start, allowing the benefits of Docker to be utilized without needing to delve deeply into the subject.
A significant advantage of ddev for companies and agencies is the slim config.yaml, which can be committed in every project, ensuring that every developer works with the same project setup.
This is also possible with Docker, but in ddev, it is very easy to understand since the config.yaml consolidates all important settings. Most important for companies: The reduced overhead to setup all this and no need to maintain it.
ddev Limitations
Ddev brings almost all the tools a web developer needs in daily life: web server with various PHP versions and extensions, various Node versions, database server and admin tool (formerly phpMyAdmin, now including Sequel Ace), email testing (formerly Mailhog, now Mailpit), support for Redis, configuration options for routing between projects (more on this later on this page), and much more. So far, I have not encountered the limits of ddev.
Story time: My personal way to ddev
I used to set-up my web development projects directly on my Ubuntu-driven machine with apache's v-hosts. I had a bash-script in place which created a new directory, git repo and added a new host.
But, this had some flaws and required manual steps afterwards pretty often. In short, it got time-consuming to maintain the custom set-up script and all the changes that were made to my system... With more and more projects my time got short and I hesitated to try and learn something thats new to me like docker.
At that time, at my workplace we all used MacBooks for development while personally I am more of a Linux guy. The solution of my workplace (MAMP) was not applicable for my personal projects.
Gladly, I changed workplaces the right time and I got introduced to a new way of how to work on web development project: ddev.
Why would you use ddev and not plain docker instead?
Using plain docker for web development would require you to either use a pre-made image or [build one for your self](https://laracasts.com/series/the-docker-tutorial).
If you don't have special needs and only need the general stuff like php, apache and mysql, then you can save yourself some time by not re-inventing the wheel and just using ddev which comes with a pre-defined image.
And it gives you even more:
Ease of choice for software and versions (like PHP and node Versions)
Sequel Ace for Database Administration
Mailpit (as of late 2023)
Mailhogfor catching emailsLocal SSL support
Redis support (optional)
Elasticsearch support (optional)
Ngrok support (optional)
Why ddev and not Laravel Sail?
Despite that I am mostly working on Laravel projects, I prefer to use ddev because it is not limited to Laravel rather than being universal for web development. With it you can run almost anything. E.g. sometimes I need to spin up a wordpress, which is just a piece of cake with ddev. Having to learn one tool instead of two or more, already validates my choice.
How to get started with ddev
Install docker and ddev
If you don't have docker installed, do so by following these steps.
Afterwards, continue with the docker post-installation steps.
Finally, head to the ddev installation manual and take all the required steps.
Verify your installation with
ddev -v.Add ddev to an (existing) project
To run any (existing) project with ddev, just head to the projects root-directory and type
ddev configwhich starts the initialization process. It asks you for some specifics. Afterwards you can start the container by typingddev start. You should be able to reach the project in your browser.
How to configure xdebug to work with ddev
To use xdebug with ddev you have to set it up once. Each time you want to debug wit xdebug you have to start your debugging session with ddev xdebug. When you're done, stop it via ddev xdebug false.
### Configure xdebug to work with ddev and PhpStorm
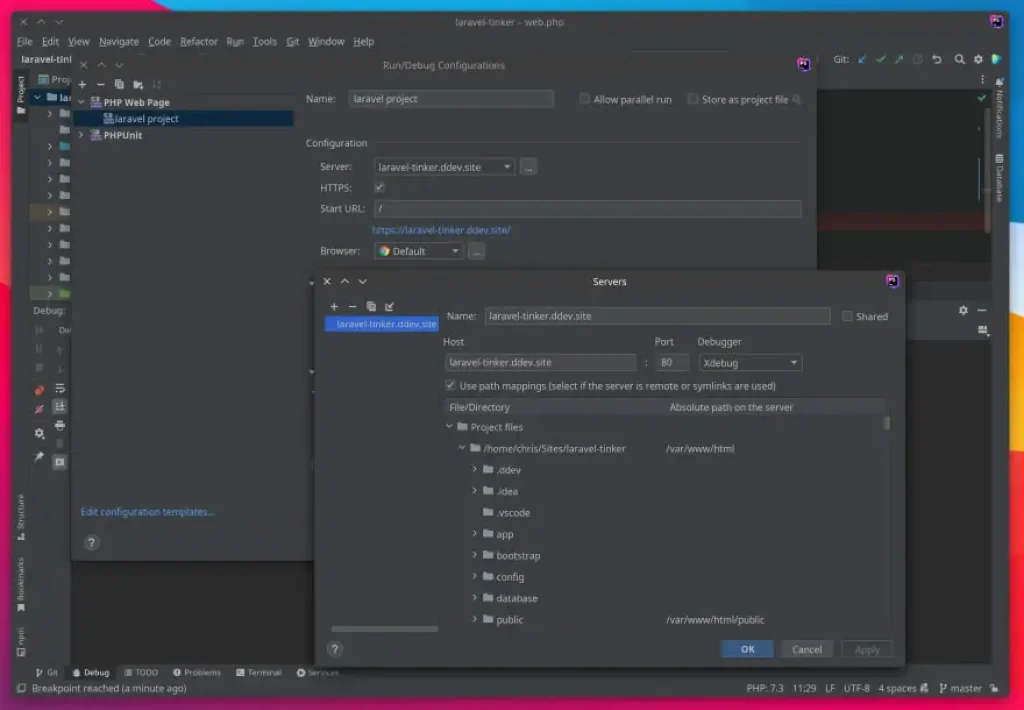
To make xDebug in PhpStorm work, you have to set path-mappings in the project debug settings. For example, all my project live in the path ~/Sites/. For a project with ddev, you have to add a path mapping from ~/Sites/laravel-tinker/ to /var/www/html.
Go to Run > Edit Configurations and Add a new Configuration. Here is a screenshot of a working configuration.
Configure xdebug to work with ddev and VsCode
The setup process for VSCode is very easy. Go to the ddev documentation and download the provided config snippet.
If your're having troubles, check the ddev and xdebug version. From ddev v1.19.0 the default port for xdebug to listen on is 9003.
New! There is an extension that lets you control the ddev settings from the VSCode interface.
ddev Cheatsheet: The most important commands
For my daily work, I found these commands as my most-used one. You can check out even more commands here.
# Add ddev to a project
ddev config
# Start a project
ddev start
# Opens the main project url
ddev launch
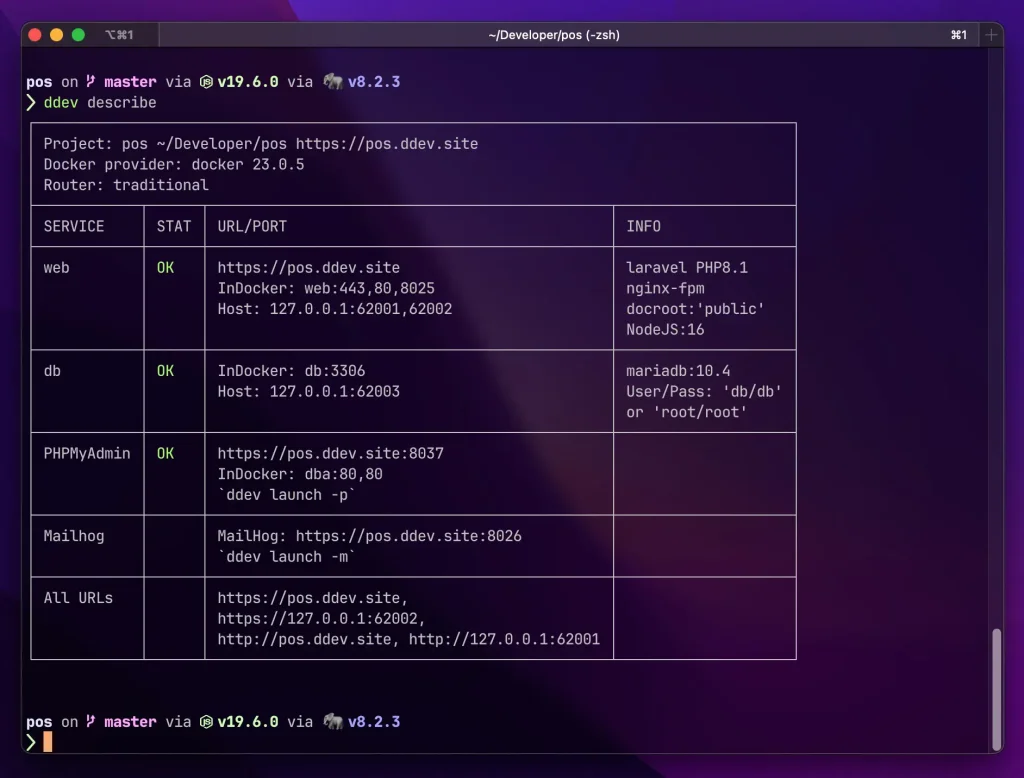
# Get information about the container, like URLs and local credentials
ddev describe
# When you change a PHP version or MySql version,
# you have to rebuild the container.
# -O: Omit/skip database snapshot <br>
# -R: Remove stored project data (MySQL, logs, etc.)
ddev stop -O -R && ddev start
# Starts a shell session in the container.
# Requires you to authenticate if your key
# is password protected. Useful if the
# container needs to access remote resources,
# e.g. when you're running a deployment.
ddev auth ssh
# (Laravel only) gives direct access to the Laravel artisan CLI
ddev artisan <command>
# Start/stop xDebug
ddev xdebug
ddev xdebug false
# Execute any command inside the container, example:
ddev exec <command>
ddev exec npm run devHow to define a custom command
ddev makes it easy for you to define custom commands. For almost every project I work on, I use a custom command called "provision" for set-up instructions. In here, all steps needed to set up the project are bundled.
Another use-case for a custom command:
# .ddev/commands/web/codequality
#!/bin/bash
## #ddev-generated
## Description: Ensure code-quality
## Usage: codequality
## Example: "ddev codequality"

cd frontend

node_modules/.bin/eslint --ext .js,.vue --fix --ignore-path .gitignore --max-warnings 0 .

## run cs-fixer
vendor/bin/php-cs-fixer fix

## run tlinter
vendor/tightenco/tlint/bin/tlint

## run phpstan
vendor/bin/phpstan analyze -c phpstan.neon

composer outdated --ansi -D -m --strict
Define a custom service, or how I call it: Enable two projects to communicate
Okay, until here, all the stuff was pretty basic. Let's tackle something more interesting. Say, we have multiple projects which we're working on, e.g. an API service that we need to call from another app.
You can just start both projects with ddev and work on them. But by default, they can't reach each other. For that, we have to use custom services and define the address where each project will be exposed to. Read about this feature in the ddev documentation.
To make a project accessible for other projects, define a yaml-file like this:
# .ddev/docker-compose.router.yaml
version: '3.6'

services:
  web:
    external_links:
      - ddev-router:taskdoc.local.ddev.site
Resources / ddev alternatives
- MacOs only: Laravel Valet
- Laracast tutorial on how to set up docker